Tuesday, 23 May 2017
Thursday, 9 February 2017
Jagil Jaill
Perkenalan

Jagil Jaill merupakan sebuah rintisan brand kaos baru yang baru dibentuk pertengahan bulan Januari lalu, Jagil Jail merupakan produk yang dibentuk dengan desain yang memiliki ciri khas tersendiri, yaitu unik dan nyleneh. Mengapa unik dan nyleneh...
Jagil sendiri merupakan singkatan dari Jawa Gila, dan Jaill merupakan sebuah perilaku ada perbuatan yang bisa dianggap sebagai lelucon jika itu dilakukan dengan positif. Meskipun jaill dianggap sebagai perilaku yang negatif, tetapi tidak semua kejaillan dianggap begitu. Jail dilakukan karena banyak hal, bisa untuk menggambarkan rasa sayang, keakraban, atau bisa juga hanya sekedar iseng. Terkadang karena kita sudah begitu akrab dengan orang lain kita bisa saja melakukan hal-hal aneh yang membuat orang lain kesal tetapi menyenangkan. Ya itu lah gambaran tentang jaill, lalu mengapa Jagil...
Jagil atau Jawa Gila dipiliih karena founder sendiri adalah orang jawa, tepatnya di Jawa Tengah, Kabupaten Tegal. Mungkin sudah tidak asing lagi mendengar daerah yang satu ini, selain khas dengan NGAPAKnya juga terkenal dengan nylenehnya. Walaupun tidak semuanya nyleneh tetapi hampir rata-rata orang tegal dianggap nyleneh oleh orang dari berbagai daerah di Indonesia. Itulah sedikit cerita mengenai Jagil Jaill..
Produk
Jagil Jaill menawarkan berbagai macam kaos dengan desain yang unik dan nyleneh. Tidak hanya itu, bagi para jailler juga bisa mendesain sendiri kaos seperti apa yang diinginkan dan dianggap unik dan nyleneh. Jagil Jaill mengedepankan kepuasan konsumen, jadi apa yang ditawarkan oleh Jagil Jaill tentu harus berkualitas dan membuat konsumen PUAS dan tidak RUGI memiliki kaos Jagil Jaill.
Bahan yang dipilih Jagil Jaill yaitu Cotton Combed 30s, dimana bahan tersebut menyerap keringat dan nyaman dipakai. Untuk ukuran Jagil Jaill menyediakan M dan L, jika ingin lebih besar lagi Jagil Jaill siap.
Contact Person :
WA atau Tlp : 085801740140
BBM : D4F42AF3
Instagram : jailjaill
Sunday, 9 October 2016
Tuesday, 27 September 2016
Tutorial Adobe Flash CS 6 (Perubahan Siang ke Malam)
Untuk kali ini saya akan berbagi sebuah tutorial untuk membuat Animasi 2D dengan Adobe Flash, disini saya menggunakan Adobe Flash CS 6. Tetapi anda tidak perlu khawatir, karena Software Adobe Flash pada dasarnya semuanya sama, hanya penempatan tool-toolnya saja yang berbeda. Silahkan pelajari lalu Praktekkan. Selamat Mencoba...
Membuat Animasi 2D Adobe Flash CS6 : Perubahan Siang ke Malam
Wednesday, 13 January 2016
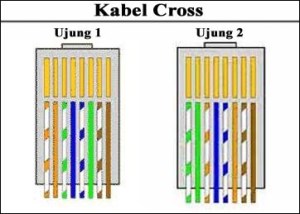
Stright and Crossover
In the world of network Crossover and Straight is a type of utp cable fitted with RJ 45 connectors with specific arrangements.
The characteristics of the crossover and straight like what?
The characteristics of a crossover type cable is installed in the cable arrangement RJ 45 starts with colors as shown below:

Whereas the characteristics of the straight type cable as below :
Straight to the type useful for:
1. Connecting the computer
2. Connect the computer to a LAN switch on the cable modem / DSL
3. Router with a LAN Connecting the cable modem / DSL
4. Router Connecting switches
5. Connect the hub to the router
Crossover is useful for:
1. Connecting two computers directly
2. Connect two pieces of switch
3. Connect two pieces of hub
4. Connect a switch with a hub
5. Connect the computer to the router
To make it?
First we used to prepare tools and ingredients:
1. UTP cable
2. tang krimping
3. RJ45 connector
4. tester
if it is available all we are ready to make cable
1. Peel the end of the UTP cable, approximately 2 cm. with crimping pliers
2. Open spiral cable, align and cable urutankan compliant images.
3. After the order according to the type that we will create, cut and flatten the ends of the cable. cut using crimping pliers
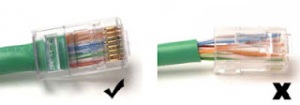
4. Put the cable is straight and parallel into the RJ-45 connector, and make sure all cables are correct position by position is correct, as shown below :
The characteristics of the crossover and straight like what?
The characteristics of a crossover type cable is installed in the cable arrangement RJ 45 starts with colors as shown below:
Whereas the characteristics of the straight type cable as below :
Straight to the type useful for:
1. Connecting the computer
2. Connect the computer to a LAN switch on the cable modem / DSL
3. Router with a LAN Connecting the cable modem / DSL
4. Router Connecting switches
5. Connect the hub to the router
Crossover is useful for:
1. Connecting two computers directly
2. Connect two pieces of switch
3. Connect two pieces of hub
4. Connect a switch with a hub
5. Connect the computer to the router
To make it?
First we used to prepare tools and ingredients:
1. UTP cable
2. tang krimping
3. RJ45 connector
4. tester
if it is available all we are ready to make cable
1. Peel the end of the UTP cable, approximately 2 cm. with crimping pliers
2. Open spiral cable, align and cable urutankan compliant images.
3. After the order according to the type that we will create, cut and flatten the ends of the cable. cut using crimping pliers
4. Put the cable is straight and parallel into the RJ-45 connector, and make sure all cables are correct position by position is correct, as shown below :
Monday, 28 December 2015
Install Mikrotik with Virtual Box.
Let's start to install ...
1. Open Oracle VM VirtualBox Manager, klik New


19.Then came the dialog box, provide a check on the "Do not show this message again" so that the notifications are not displayed anymore. Then choose Reset. And Wait until the login dialog box appears, then the type Mikrotik Login admin


Wait for my next post....
Wednesday, 16 December 2015
Setting Access Point
Now here I will share knowledge about how to set access point, prior to his ways there are some tools that you need, namely:
1. Router Access Point
2. leptop or PC of course.
Okay, let's get started ...
1. Incidentally, I use the access point from BLUE-LINK, before the first reset is used do not forget.

2. Then, connect to your access point. (no need to use data)
If you are connected to the access point, go to the browser and type the IP address listed in the tool tersebut.For example: (192.168.2.254)
If you are connected to the access point, go to the browser and type the IP address listed in the tool tersebut.For example: (192.168.2.254)

3. If you have entered, it will appear as below. Fill in the username: admin and password: admin, and then OK.

just focus on the SSID, the content according to your wishes. and if you want the password please just on security changed into a WPA-PSK, and fill in the password you want. if it is click Apply Changes


Subscribe to:
Posts (Atom)