Yang wajib kita miliki dalam proses instalasi Linux Ubuntu versi 08.10 adalah:
1. Laptop atau PC
2. Master drive Linux Ubuntu
ok pertama kita buat laptop kita booting dari CD/DVD atau dari FlashDisk, kemudian
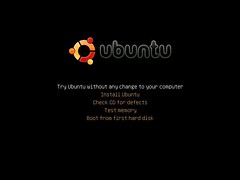
setelah keluar tampilan seperti diatas pilih "Install Ubuntu"
kemudian pilih bahasa dalam proses instalasi, kita pilih "english"
lalu pilih time zone kita pilih "Jakarta"
disini kita disuruh milih layout keyboard, kita klik "forward" saja
jika harddisk kita tidak akan dipasang os yang lain kita pilih "Guide" saja tetapi jika kita ingin mengatur partisi sesuai keinginan sendiri pilih "manual" lalu klik "forward"
jika muncul peringatan seperti diatas klik "continue"
pertama kita buat partisi swap, biasanya berkapasitas 2x kapasitas memory, di bagian "use as" pilih "swap area"
kemudian kita buat partisi /(root) minimal 7,5 GB, dibagian "use as" pilih "ext 3" dan di bagian "mount point" pilih "/"
dibagian ini kita akan membuat login komputer, isikan field nama, kemudian buat passwordnya, setelah semua terisi klik "forward"
kemudian akan muncul konfirmasi apakah benar akan melakukan instalasi pilih "install"
tinggal kita tunggu hingga proses instalasi selesai
kemudian pilih "restart now"
maka proses restart akan berlangsung
jika proses restart selesai maka akan muncul tampilan seperti diatas, tinggal ketikan "username" yang tadi kita buat
jika berhasil masuk maka akan muncul tampilan seperti diatas dan siap digunakan
sumber: infoos.blogspot.com


![Cara Menginstall Ubuntu 12.10 di VirtualBox [Ubuntu 12.04 LTS]](https://lh3.googleusercontent.com/blogger_img_proxy/AEn0k_srQlVfs-d5EqiW8322YqDHhih9N5B2A4ElPTkO6JNkWVBzBBq23w3P7sTmXg3UtK0nzitq6y8YBesPvf9dHc-6_tH7D93viwFui_IQP-fo3Yjr54uOCAl12N78OzzJbwUEyEc0TQ6nSAjsChcbe_3XBtx4=s0-d "Cara Menginstall Ubuntu 12.10 di VirtualBox [Ubuntu 12.04 LTS]")
![Cara Menginstall Ubuntu 12.10 di VirtualBox [Ubuntu 12.04 LTS]](https://lh3.googleusercontent.com/blogger_img_proxy/AEn0k_tm0Eqt2tIgm91VrDNc7D4x0D-uc7Jd7fwbmjWMOAfpBxSaJoAA0ObhaOqeIEHJPF0CLyGTtkQXCZ63L45rdLCZKjwBfA0S4zhwRzTbEbgS80KD1pUu-FpseFqGDHR5VY-7FOcl0u6xVvHWhwzGJ_X1U7a3=s0-d "Cara Menginstall Ubuntu 12.10 di VirtualBox [Ubuntu 12.04 LTS]")
![Cara Menginstall Ubuntu 12.10 di VirtualBox [Ubuntu 12.04 LTS]](https://lh3.googleusercontent.com/blogger_img_proxy/AEn0k_srCE2bUxhXUjfL1txBT_1o-hdCuuk313mRnjvk9OmH5_JEimAS-pz2coytwFqGfwDWGZ2Cnu7NiR_a07tk6ta6OsRA1IlhfbI9kMuzlQ8Il4eiG7XaxWAB2wX_BdixWUB1ULe1JWHMITxL7M0rylzuBdnl=s0-d "Cara Menginstall Ubuntu 12.10 di VirtualBox [Ubuntu 12.04 LTS]")
![Cara Menginstall Ubuntu 12.10 di VirtualBox [Ubuntu 12.04 LTS]](https://lh3.googleusercontent.com/blogger_img_proxy/AEn0k_tgrOAXyFTpak6qgfoMv7BDMu1gY4mx-bX05m-6xLqZNGBP-RdjHXej8IcIt4cd4wui0utOrcr6rrZlksLE1zxtMMDmOqBiji-3_f9dUFtHV-i66H_AET32MaCNyaezyozKEsMA0kNkskaiGlQaDNwomPp_Hg=s0-d "Cara Menginstall Ubuntu 12.10 di VirtualBox [Ubuntu 12.04 LTS]")
![Cara Menginstall Ubuntu 12.10 di VirtualBox [Ubuntu 12.04 LTS]](https://lh3.googleusercontent.com/blogger_img_proxy/AEn0k_uuc_GYfivGXXqTdCz0q9ZQ701TtZRx59GQLS9JqBr_LmQwGJi9s2VOba08Nl0FY9KrSxnVxwT2ieGufeW7LfwK-uKFmflgGKQV3UQ5ZIWhp67bVkQT2GIq7sj4tgTQkL74nycYK23h-huRhAMYRfUJDCE85Q=s0-d "Cara Menginstall Ubuntu 12.10 di VirtualBox [Ubuntu 12.04 LTS]")
![Cara Menginstall Ubuntu 12.10 di VirtualBox [Ubuntu 12.04 LTS]](https://lh3.googleusercontent.com/blogger_img_proxy/AEn0k_uvWyc1g6-dKXF6eFDYDDHjqPRwXXozrlEoBoxMV39bDK3_EWKeNDxoMiDRNle8DHgI85zlfQUoP7Ig8enVeS92v_UnT3JbiSaM4xJnFPX0oz81eOJkXDbiqevvzVi71axYF63Imfuv2cQ7q4GlW6aDvFYlpA=s0-d "Cara Menginstall Ubuntu 12.10 di VirtualBox [Ubuntu 12.04 LTS]")
![Cara Menginstall Ubuntu 12.10 di VirtualBox [Ubuntu 12.04 LTS]](https://lh3.googleusercontent.com/blogger_img_proxy/AEn0k_sdXgieG-vN7UlbsV0OGdAWSk0QFYzAwWS5luc2FqRgoLGFyIm6_ENjMHs6coSC5Mnpss9U9Ym-GDAK7qvNMaiqkbQ6HbA9qB2VU7x69YpsC2-pv2khRhDDyHFT3lOxkK_GGK0HuwMTjbMFyW7bsrsKZ_UEjg=s0-d "Cara Menginstall Ubuntu 12.10 di VirtualBox [Ubuntu 12.04 LTS]")
![Cara Menginstall Ubuntu 12.10 di VirtualBox [Ubuntu 12.04 LTS]](https://lh3.googleusercontent.com/blogger_img_proxy/AEn0k_t_jwIPFlcYfKX8cWDpJvdZvbLI3XnsHyy65IgWn_WEos3aaQEQGrGwzEaDbHB4TvyUEUPHq0Uy3xO-D1OzJjyUf4Pzhz9TLgtbmCakVccppBJAbstPU_2q85TUrwWAtATFNrtqsTaazUDWPkKiQ84TxC9dYw=s0-d "Cara Menginstall Ubuntu 12.10 di VirtualBox [Ubuntu 12.04 LTS]")
![Cara Menginstall Ubuntu 12.10 di VirtualBox [Ubuntu 12.04 LTS]](https://lh3.googleusercontent.com/blogger_img_proxy/AEn0k_vEoLrbb0idrdUXpJTUZh3i3O45NlZWDaWuyVWQ0CD_gc6_4aOB_w_N8K_nCJORAMP1OybdqPoEcU6d3A3m2-GlkWoQuXv3qOKXxa_udoHPr3qbacyWwOvZL_VZt1Boq4rCulrGJVgSd_zGW1NuG5UWmObM3A=s0-d "Cara Menginstall Ubuntu 12.10 di VirtualBox [Ubuntu 12.04 LTS]")
![Cara Menginstall Ubuntu 12.10 di VirtualBox [Ubuntu 12.04 LTS]](https://lh3.googleusercontent.com/blogger_img_proxy/AEn0k_scuQ1F9_DSRGNOA_zNKVf6NdKpfGu2M1g17yPjlMyeU3BvSpY-h8xvFly_sDsh65PwUkyixblVaKP_rL4aP-wunje7q5yF6FPOhPpwo1vzZnT2rcQCF6cbgT7-F1je7KzH4R0etWthSUlJH8E1EwU-kd7TRQ=s0-d "Cara Menginstall Ubuntu 12.10 di VirtualBox [Ubuntu 12.04 LTS]")
![Cara Menginstall Ubuntu 12.10 di VirtualBox [Ubuntu 12.04 LTS]](https://lh3.googleusercontent.com/blogger_img_proxy/AEn0k_skuRC2cMWSMUMkw38M15w-K0CYCNx8B01RVuXyiJmCH0q0pyXiUDha3yl5W_2O63dDcE21LZ0-uu9LMdYh8aqLT6HH2MlgobbvZprnflujmXwIpzmpa90XZbqLuraly8r7aygmCfOw6xZXVlcR1pNZcN4v4Bo=s0-d "Cara Menginstall Ubuntu 12.10 di VirtualBox [Ubuntu 12.04 LTS]")
![Cara Menginstall Ubuntu 12.10 di VirtualBox [Ubuntu 12.04 LTS]](https://lh3.googleusercontent.com/blogger_img_proxy/AEn0k_tJd5FGd8IUXOOZC17kFFMGkYi9sQfCVuBVxsdIo50HdIwbWfVnUeFbVzKb2-SJbbRzEaREV5fCrOFi9M0WmGiCzGvHIrHjSc6_bjIZkjn2Ns6-gzSVzHz3uqRNSANJMQ3hOZ6Dj75UUOkYc4uJJQhwKwtYusg=s0-d "Cara Menginstall Ubuntu 12.10 di VirtualBox [Ubuntu 12.04 LTS]")